Monday 26 September 2011

Quick Update: Apologies, Airbubbles (Dead Marshes: Part 4) and Sturmpionere

Just a quick Blogpost to apologise for my absence over the past few weeks. I've been really busy at work, and I'm doing some work on my house which has meant losing my painting room for a few months. I'd never have thought that losing the spot you go back to in the evenings and pick up the brushes could make such a difference. Ah well, it's in a good cause I suppose. Or at least that's what my wife keeps telling me.

I thought I'd take the time to draw together a couple of loose ends: the last of the tips from The Dead Marshes posts (with many apologies to those waiting - yes, Mr Saturday, that means you - mea cupla!) and an update on one of the smaller units I started in early August.


The Dead Marshes: Dealing with Air Bubbles

I rather optimistically wrote in the Blogpost from 4th September that: "You’ll get quite a few air bubbles in the mixing process, but these never seem to have been a problem for me when the resin dries – they just seem to float to the surface and disappear (The note which comes with the Solid Water” packs says you should try and avoid getting a lot of air bubbles in the mixed water resin, but as I mentioned this hasn’t been a problem for me by the time the mixed water resin is dry)." I generally stand by this, but with a couple of major ampliciations which I wanted to mention based on my experience from finishing The Dead Marshes boards.

First off, when mixing the Solid Water resin by syringe I seemed to get a lot less air bubbles. When you are making a lot of Solid Water, and pouring resin and hardener together from the jars, I seemed to get a lot more air bubbles. There must have been something about these bubbles (maybe the way I mixed the resin) that they didn't go away in the first few hours on a couple of the pools.

Second, if that happens, don't panic. The solution is a bit painstaking and involved getting the air bubbles out with a pin before the Solid Water has totally set. It's painstaking, but it works.


I even found that you could make quite severe impressions in the still-unset water to get a patch of air bubbles out, and the resin would reset back to a flat surface. The picture below is an example of something which I really poked at for a while, which has re-set flat (to my relief).


Third, if you're still left with some bubbles, you can always stain or paint over these with some paint mixed with the next layer of mixed resin. That works very well. The picture below if the clearest shot I could manage of this sort of "staining" approach (which I admit isn't very clear at all!), but I promise the "staining" technique works quite well.


That's it chaps. Not much of a tip, but it might help you if you get stuck. If anyone has more specific questions (particularly if what I have written is not very clear - which is highly likely!!), please feel free to post them in the comments.

Late War Sturmpionere

I enjoyed converting and painting this large section of German Sturmpionere. There are a few accounts of line troops using bags of grenades and concentration charges against British tanks at Fontaine on 23rd November 1917 as part of the Cambrai offensive. The grenade bags were dropped in front of tank tracks, or even dropped from the upstairs of houses in the villages as the "B" Battalion tanks attempted to clear the village without infantry support.

Another situation where similar tactics were tried was by the 3rd Company of the 97th Infantry Regiment in the engagement south-west of Cerisy on 8 August 1918 against advancing tanks. In the thick fog and concealed by the undulations in the ridge line to the south-west of the village, several tanks were destroyed or disabled by a combination of armour piercing SmK. rounds fired by German machine gunners or by concentration and satchel charges deployed by assault grenadiers swarming round the tanks once immobilised or separated from their supporting infantry.


There are no doubt other examples, but I thought that the unit offered something which was historically accurate and also a little different to the late war German players faced with ever increasing numbers of allied tanks.


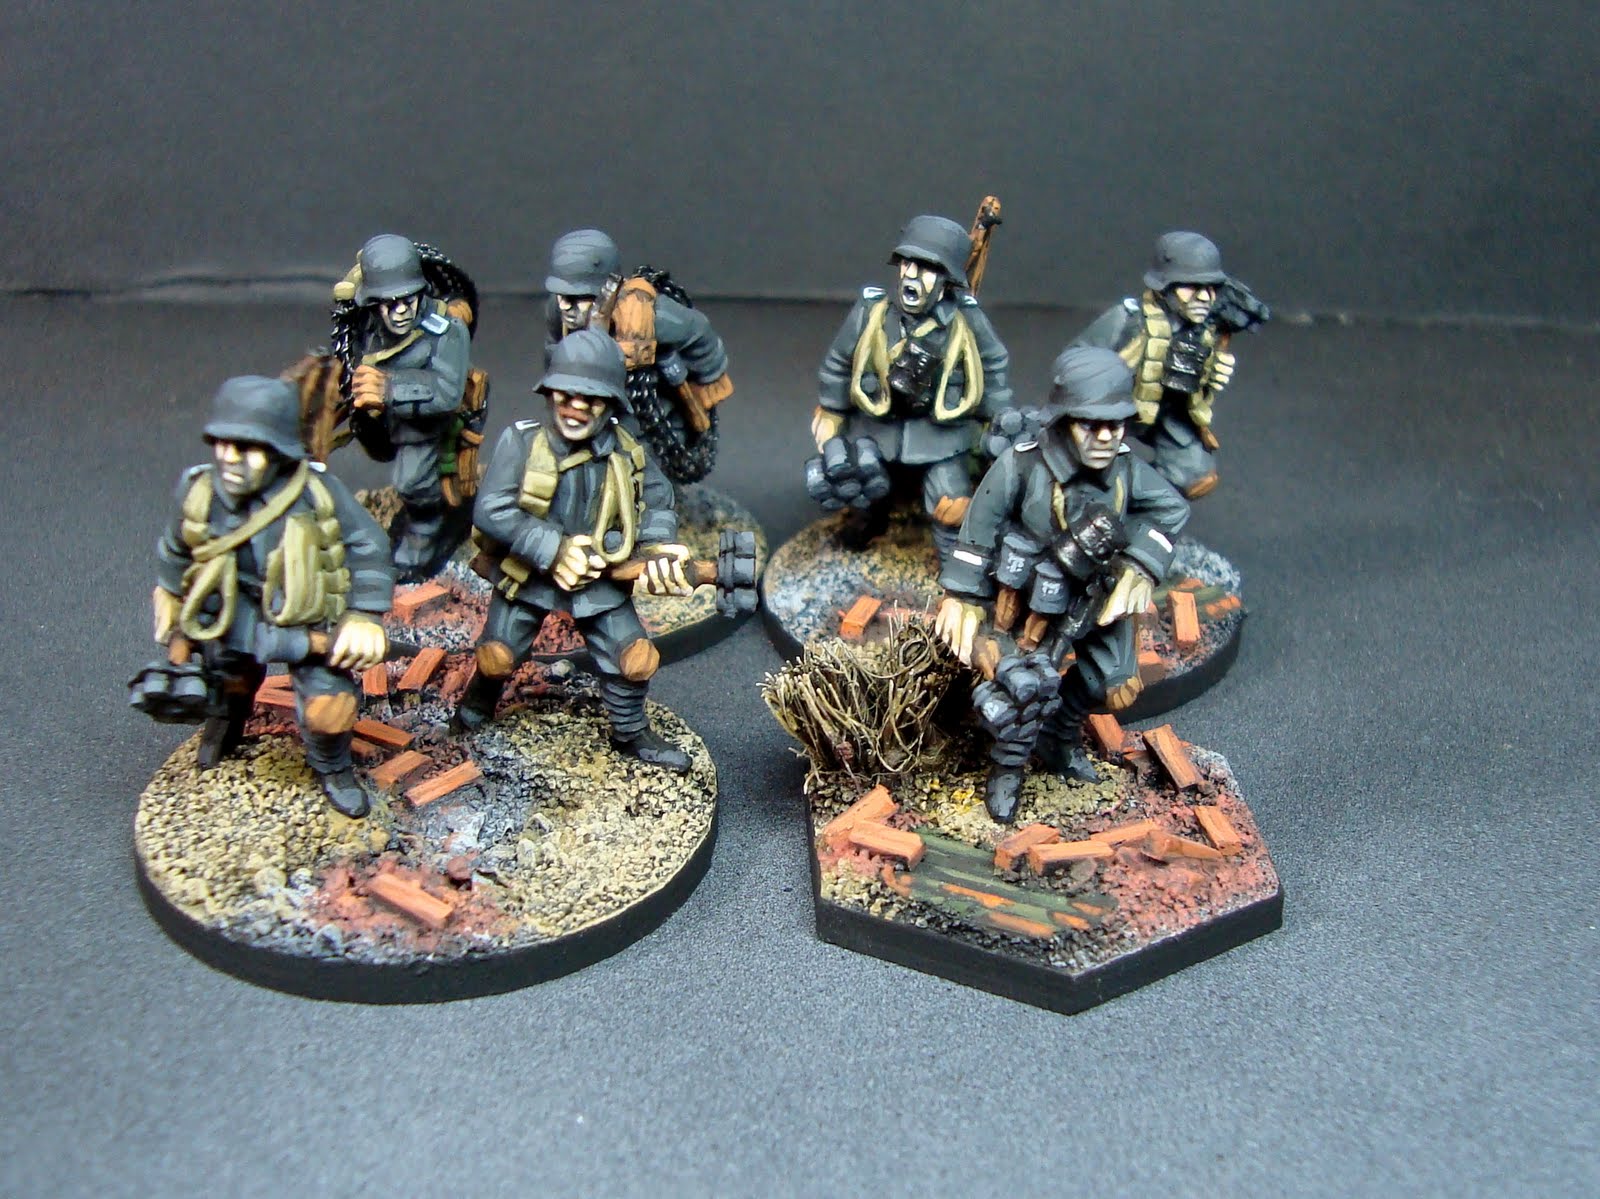
The figures are slightly converted Great War Miniatures figures, and were painted with Vallejo and Plaka before being varnished. To my eye, once I'd finished them, they did have more than a look of 1940 about them (which I was trying to avoid), but perhaps that's just me. They may have looked more firmly 1917-1918 had I done the helmets in camouflage colours. Perhaps next time!

That's all for now. Again, many apologies for the slow posting and the slow commenting on other people's blogs. I very much like to do that, but as I mention work has got in the way. I may be blogging a bit less in late September/ October until things get back to normal on the worksite ... sorry, at my house, but I'll see if I have some older stuff to post which hasn't appeared yet. Until then, mes braves....

Thursday 8 September 2011

Engreiftruppen and Stosstruppen Brigade, March 1918 in 10mm

One of the projects I worked on a while back was three 10mm Western Front late war brigades for larger scale games based on the "If the Lord Spares Us" set of rules from TooFatLardies.


These rules are meant for battalion and brigade sized games, and involve a greater range of artillery assets than in "Through the Mud and the Blood" (where the effect of artillery fire does not differentiate between different calibres of gun).

Although we have played "If the Lord Spares Us" quite a lot at Lard Island, focusing on the Great War in the Middle East, we've yet to start properly wargaming the Western Front at this level. One of the reasons was the lack of suitable figures - it just didn't feel right proxy-ing Turks and British battalions in tropical kit into The Somme.

As I was pretty keen to look at the next tactical level up from the platoon-sized actions of "through the Mud and the Blood", I started work on a German late war division of Eingreiftruppen with some attached Stosstruppen from around the period of Operation Michael in March 1918. Here's where I got to….

The figures were all from Pendraken. I was pleased with how they painted up. So much so that I ended up buying both a late war French and a late war British brigade this year at the Salute show. I'll post the now-completed opposing British and French brigades on the Blog in the next week or so, just as a bit of a change to the on-going terrain posts which I've been showing of late.

First up, Battalion command with infantry, MG08 heavy machine gunes, flammenwerfers and MG08/15 light machine guns …


… a close-up shot of 37mm anti-tank guns and supporting 150mm and 77mm field artillery…


… an A7V in 10mm scale, and a close up of a howitzer position….


… and finally, a brigade in a box (well, almost - it occupies two boxes)


Hopefully we will be getting a few games in with them before Christmas. When we do, I'll post the battle AARs here in due course.

While I was photographing the 10mm figures, I also had time to have a brief photo session with some of the larger scale German officers and NCOs which we use in our games of "Through the Mud and the Blood". These all use the hexagonal basing which helps the umpire or gamesmaster tell at a glance when running a game where the "Big Men" are located on the tabletop.


Next time (probably this weekend), the final part of the Dead Marshes series of terrain board posts. Hope you can join me again for that.

Sunday 4 September 2011

The Dead Marshes: Part 3 – “Solid Water”


After painting the marshy terrain boards, I had to add the final component – water. I’ve used a variety of modelling water over the years. My preference is for water resin, which comes as a two-part mixture of resin and hardener and dries very hard as a permanent feature. You can find modelling water which is just poured into terrain and forms a slightly springy jelly on the surface and which can be peeled off, but for terrain boards the mixed water resin/ permanent variety is my strong preference.

I’ve purchased a product called “Solid Water” from Deluxe Materials in the UK for about eight years now. I can strongly recommend it (although I’m sure there are others which are very similar). It’s easy to mix and stains quite nicely with normal acrylic paints. You can pick “Solid Water” up from many craft suppliers in the smaller scaled packs (50, 90 and 180 ml), but as I wanted a fairly extensive amount of water on the terrain boards, I settled on a couple of the 350ml packs.


I find it a bit difficult to estimate exactly how much water resin you need in a model until you’re actually at the pouring stage. However, I think the trick is to over estimate slightly, especially if you are pouring into deep recesses in the terrain.

Mixing the resin is straightforward (2 parts resin to 1 part hardener). You’ll get quite a few air bubbles in the mixing process, but these never seem to have been a problem for me when the resin dries – they just seem to float to the surface and disappear (The note which comes with the Solid Water” packs says you should try and avoid getting a lot of air bubbles in the mixed water resin, but as I mentioned this hasn’t been a problem for me by the time the mixed water resin is dry).

I add in any stain at this point so that the mix is consistent – for this project, I stained with Vallejo Russian Green and Vallejo Black, although I’ve used a variety of acrylic paints in the past. You can also get some interesting “swirly” stain effects if you pour the mixed water resin onto a model and trace your stain (using a paintbrush) through the resin …


But that wasn’t the effect I was aiming for here. I was going for something less pleasant, less artistic, entirely more corrupted…. In fact, a ”dismal outlook, the waste of treeless, houseless, greenless landscape, destruction incarnate, the all-pervading smell of stagnant shellholes, with their frequently dreadful contents, and the ever-present expectation of a sudden “area shoot”, a storm of high explosive and shrapnel breaking out at a moment’s notice; and one marvels that any human being could live through such conditions and keep sane” (Major R L Bond, DSO, MC, 23rd Field Company, Royal Engineers).

I stained each of the cups of mixed resin with a faint green tinge. Enough to look suitably thick and viscous as it pooled in the deep hollows of the shell craters, but not too opaque to conceal all detail at the base of each of the craters.

Pouring the mixed resin can be done in a number of ways. I have found the easiest to be a syringe (for small, detailed applications) and a small plastic cup with a pouring lip (for larger applications).


It’s best to pour from, or inject into, the centre of the location where you want the resin. In addition to the obvious reason (that’s where the water pools) it also helps ensure that any drips of resin from the syringe or cup can be covered over with more mixed water resin later. I then steered the mixed water resin into the edges of the shell crater using an old paintbrush …


I try and keep the layers of resin thin – this helps drying. This is the reason why I carved out the shall craters fairly shallowly in the design stage of the terrain boards – I knew in advance that if the craters were authentically deep, this would result in needing a very high number of mixed water resin layers at the Solid Water” stage. I don’t think you really need the full authentic depth anyway as the resin is very good at creating an illusion that the craters (or any water feature) is deeper than it actually is.


It wasn’t always possible to keep the layers super-thin, however, partly because of the odd shapes in the terrain boards I ended up pouring and injecting the mixed resin into. But I aimed for a covering about a couple of millimetres in depth for each layer. This has worked fairly well in the past. You’ll see from the photos in this Blogpost that a number of small stones show through the water. This is because the first few pourings of the mixed water resin may not cover all the surface detail and surface undulations completely. By the end, though, they should all be submerged, but I’m anticipating that it will take quite a few return visits with fresh resin layers to finish the job. (I’ve probably got a couple more pourings before these terrain bases are fully finished, but to keep the Blogpost momentum, I thought you’d like seeing these pictures now).

After pouring the mixed water resin, I always double check that the terrain bases are completely level.


I try and leave them in a corner of the garage where no one’s going to touch them, and just keep a check on them from time to time just in case something like a stray fly or moth lands in them before they’re “set”. Oh yes, bitter experience there, folks!!

Any spare resin can be used to trace some puddles in appropriate places, such as down the sides of trenches.


Hardening takes about 24 hours, but I try not to wargame on water resin bases until at least 72 hours have passed. I also took extra time with the special features, such as the arm of the Fallen soldier entombed in the mud and slime….


Squire nagged and bullied till I went to fight,
(Under Lord Derby's scheme). I died in hell -
(They called it Passchendaele). My wound was slight,
And I was hobbling back; and then a shell
Burst slick upon the duck-boards; so I fell
Into the bottomless mud, and lost the light.
(“Memorial Tablet” : Siegfried Sassoon)


That’s it for this post. I’ve a very small amount of micro-details from the bases which I’ll post next time. After that, I’m not quite sure what I’ll cover next. Possibly some suggestions for rule adaptations for Third Ypres (along the lines of the “Rolling into Action” article I put in the TFL Christmas Magazine last year), or maybe some photos as I finish the German heavy weapons and artillery teams I started last month. Whatever it is, I hope you’ll join me then.

Thursday 1 September 2011

Meeples & Miniatures Podcast - Episode 78

I'm guessing that by now quite a few of you may well have heard the Meeples & Miniatures Podcast (number 78) in which Neil Shuck interviews my good friend, Richard Clarke from TooFatLardies.

Meeples & Miniatures Podcast - Episde 78

Most of the discussion is about wargames rules writing and rules mechanisms, and Richard's attempt to build in "friction" and uncertainty into his wargames rules, including his World War One set "Through the Mud and the Blood". As you may also have noticed, these are also my preferred set for wargaming the Great War, although I do like using others from time to time.


If you've not listened to Neil's podcast before, it's a fantastic resource and episode 78 is a great place to start.

If you've not come across the TooFatLardies rules before, this is also a perfect place to start as Richard has a knack of explaining his design process and philosophy very clearly.

It's a really excellent episode, and highly recommended. Five out of five star shells.

Related Posts Plugin for WordPress, Blogger...