They found themselves in a “wide almost circular pit, high banked from the West. It was cold and dead, and a foul sump of oily many coloured ooze lay at its bottom. In this evil hole they cowered.”
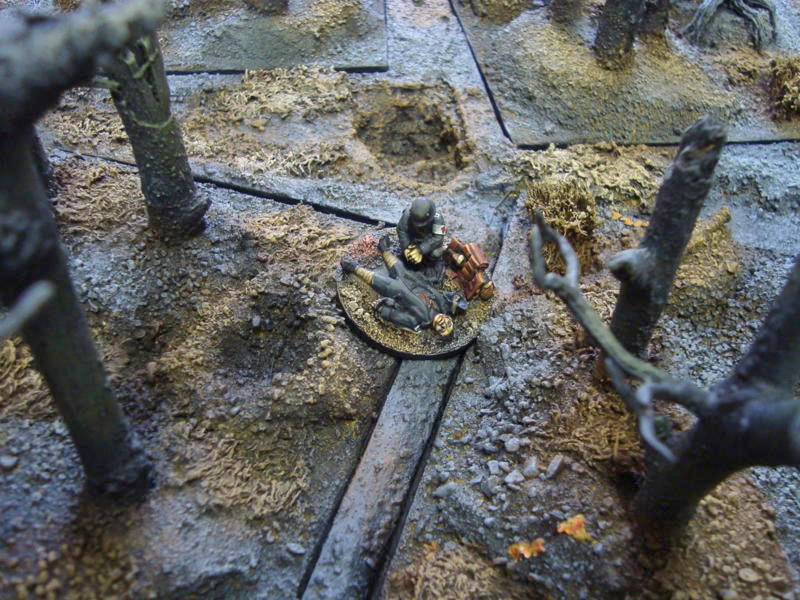
“Cold and clammy water held sway in this forsaken country. The only green was the scum of livid weeds on the dark, greasy surfaces of the sullen waters. Dead grasses and rotting weeds loomed up in the mists like ragged shadows of long forgotten summers.”
If you recognised this place, well done. I’ll wager that you’ve all been there before in your mind’s eye.
Yes, it’s not actually Flanders at all. It sounds like Passchendale, or perhaps the Somme. But its not.
It’s the Dead Marshes just near the Morannon Gate in Middle Earth. And the cowering wretches in the hole are Frodo, Sam and Gollum, and not a group of mud-drenched Tommies.
As many of you will also know, the two places – the Western Front and Middle Earth – are connected closely. J.R.R. Tolkien served in the British Army in the Great War, arriving in France in early June of 1915 and seeing combat in mid-July 1915. Tolkien lost some of his closest friends in the War, and a number of authors have made strong claims that his wartime experiences formed a turning point in his life.
My interest in the connection between the Dead Marshes of Middle Earth and the flooded lands of the Western Front came about in trying to recreate some truly abysmal terrain on a couple of terrain boards for our Great War set up. I had plenty of images of the battlefield of Passchendaele (perhaps the location most might first think of as a flooded and tortured battlefield) in Peter Barton’s outstanding book, “Passchendaele”. These often famous images conveyed a lot of the horror of the battlefield, the desolation and the unremitting grimness of having to fight through the elements and over a shattered land before finally confronting the enemy.
However, something also lingered in my mind from the Dead Marshes when I started thinking about flooded lands. Perhaps it was a memory from Sir Peter Jackson’s film of “The Two Towers” as Frodo falls into the water entranced by the haunting images of fallen soldiers and dead Kings. Perhaps it was from reading the chapter on the Dead Marshes, remembering that, in Tolkien’s own words, "My Sam Gamgee is indeed a reflexion of the English soldier, of the privates and batmen I knew in the 1914 war, and recognized as so far superior to myself".
As I read more, I realised that in Tolkien’s own words from one of his letters, “[t]he Dead marshes and the approaches to the Morannon owe something to Northern France after the Battle of the Somme”. I was also finding the connection hard to shake out of my mind.
At the same time, I was wanting to try and do something different with the next couple of terrain boards I wanted to work on. First, a few words of explanation. A couple of players at my local club have mentioned that our Great War terrain looks a little too dry, too neat, maybe even too ordered.
It’s a fair comment, as you can see from the above picture. Perhaps I need to introduce a little of the chaos of War into the terrain.
Whatever my clubmates had on their mind, it was perhaps a fortunate conversation. I’d wanted for a while to try and add a couple of No Man’s Land terrain boards featuring particularly difficult terrain. There’s a historical reason for this. Some of the terrain in No Man’s Land would have been simply abysmal, whether in Flanders, on the Somme and or elsewhere in bad weather. Bad terrain offers some interesting wargame opportunities. It might canalise an attack, impede movement, or bog down tanks. It offers challenges to the players, and that can only be a good thing in gaming terms.
The idea then took root for me to prepare a couple of terrain boards featuring bad terrain, whether flooded, broken, or otherwise marshy. I didn’t want to make a dozen of these, but I wanted enough to make a difference in a game. These boards needed to fit with the other terrain (at least plausibly). And they needed to be interesting to model.
Ah,....now you can see that this is where the Dead Marshes crept back into my mind.
I’m not at all saying that modelling a marsh or boggy ground is uninteresting by itself. Far from it. But I was wondering if there was more that I could do with that idea. I was wondering if it might be interesting to try and recreate historical terrain but inspired by a fictional setting (which was itself rooted in that historical setting). That's sort of a cross-over of a cross-over. Does that sound chaotic? If so, then perhaps I'm on the right lines.
Well, you’ll soon be able to see for yourselves whether this idea worked, won’t you....?
Showing posts with label No Man's Land. Show all posts
Friday, 1 July 2011
Tuesday, 14 June 2011
Glasgow Copse - artillery emplacement insert
After the excitement of the TooFatLardies Games Day 2011 on Sunday, I had a quiet evening last night progressing the gun emplacement insert for the wooded terrain board, Glasgow Copse, I'd finished a weekend ago. I’d built this in the same way as the other inserts, starting with a Styrofoam square, mounted on a piece of 3mm marine ply of the same size. The “walls”, of the emplacements were built up with offcuts of Styrofoam, and revetted with Green Milliput sandbags, plastic corrugated iron and cardboard “planking”. In other words, exactly the same as the other inserts, with perhaps a little more in the way of sandbags to protect the gun crew.
I’ve been long tempted to try and built a more substantial gun position, with more of a wooden bunker look – and that may well be one of my next projects. However, here I was looking for a hastily constructed gun position, providing rudimentary cover for an artillery crew who would have manhandled a field gun into the front line to take on allied tanks advancing in the open.
I wanted to try and make the new gun emplacement insert as consistent with the other inserts and wood bases in the Copse. I used the same paints and also the same effects. As before, I used some very hand leaf scatter from Antenociti’s Workshop, really to try and “set a time and a place” – being an Autumn setting for the Wood, perfect for Cambrai and Bourlon Wood in November 1917.
The leaf scatter was glued in with PVA glue, each leaf being lifted into place. I’d thought of truly scattering the leaves, but somehow that didn’t look quite right. I was very much aware that there is no foliage on the trees (having been shredded by shellfire), and part of me is still nervous that a large dump of leaves on the ground might look a bit incongruous. Maybe the single leaves look a little strange – but on balance I thought they looked OK. Comments welcomed if you think otherwise !
When the glue had set I dry-brushed the leaves with some highlighted orange and ochre, and gave the leaves a wash with some dirty water from my brush-cleaning pot to dull the colours down slightly.
Next, I cut some brass rod for use as discarded shell cases, filing down the rough edges, and gluing these onto the edge of the base. I put the artillery base in position to check I wasn’t gluing the shell cases where they would be placed. Keen eyed readers may notice that I’ve tried, but not quite succeeded in getting the base of the artillery team to be quite the same as the base of the gun emplacement insert. Some re-painting of the artillery base to come later, perhaps !
Finally, I prepared some camo netting which I’d bought a while back. I usually like to make this a bit more “used” and dirty looking than the neat stuff which comes out of the pack.
I filled an old plastic take-away food tub with some more of the dirty brush water and diluted dark brown paint and gave the netting a good soaking, before stretching it out to dry overnight.
I’d be interested if you have any readers of this Blog have experiences with camo netting for 28mm figures. I have to say that this netting, when stretched out, looked a little fragile for club use and regular play – any comments and thoughts are very welcome !
Next stage, I’ll try and finish off the gun emplacement and the artillery piece, ready for a game in a few weeks.
Sunday, 5 June 2011
No Man's Land Terrain: Free-Standing Trenches - Project Finished
I finished off the "Winter Sports"/ No Man's Land free-standing trench terrain board late last night, after what seemed like an eternity of dry-brushing! I found it very difficult to get the board finished quite as I wanted, and I thought I’d pass on a few of the (hard and bitter) lessons I have learnt!
To start off with, here’s the finished board...
That doesn’t seem too difficult, does it – “how on earth was that so difficult”, I hear you ask. Well, I don’t quite know what went wrong, but here’s some clues.
1. Don’t just have a starting Plan – remember to make notes as you go along.
One of my big problems in painting the free-standing trench board was that I’d finished the Glasgow Copse/ Wood board the weekend before without making any notes about which paints I’d used. This shouldn’t have been a problem, except that I had about three different grey paints and two different brown paints and I tend to mix them all together to get the right shade. I thought the Wood looked about right, but (DOH!) I had forgotten to note down how I had got the colours I aws happy with. For a good couple of hours on Friday evening and yesterday morning, nothing I mixed was looking right.
I’d started from this point...
..and finally got to about this point after much bad language, bitter regret and bashing of my head against an invisible wall.
So, Lesson Number 1 for me to take away is – don’t just make a starting plan – remember to make a few notes as I go along.
2. Try something different now and again
These were the 17th and 18th terrain boards I’ve done for the St Albans TooFatLardies’ Great War project. So I should have a clue what I am doing by now. However, I’d noticed in some of the other trench boards that the corners of the trenches and the base of the trench walls were not – how can I say this – grubby enough. They looked a bit clean. I’d had no success trying to paint a water-based dark brown or black into the nooks, crannies, crevises, gaps of the trenches. The paint just didn’t seem to flow into the spaces until I switched to a very dark brown enamel paint/ white spirit mix, which flowed in nicely.
It’s the first time I’ve used spirit based paints on a terrain board and I liked the result. Lesson Number 2 for me to try and remember - Try something different now and again: Don’t just stick to what’s worked before.
3. See the world from a different angle
After what seemed like hours of dry-brushing of the trenches and surrounding ground, I wanted to try and paint some of the detail in the trenches like the corrugated iron (made out of corrugated card), broken duckboards (made out of artists mounting boards) and old ammunition boxes. This called for a much more delicate approach than I like to use for terrain, and was well-nigh impossible until I tilted the base completely on it’s side allowing me to get to the details I wanted. Lesson Number 3 – I need to remember to see the terrain from a different angle if I get stuck.
Here’s a picture, taken from one of those odd angles made possible by the terrain board being at a 90 degree angle.
4. Black(Dark)water
Finally, late last night (and after three bottles of Hoegaarden and a pretty good episode of Wallander on BBC3), I decided to add in some water effects. The product I like to use is called Solid Water, a two part clear exopy (two parts resin, one part hardener) which dries rock hard and is very durable. It looks good when it’s dried, although it does take a considerable time to dry or “cure” – I’m not sure what the right phrase is.
I’ve used it before, no problem, but last night it just seemed to be a lot more tricky to use. I blame the Hoegaarden! The Solid Water has to be mixed, and the syringes which come with the product only allow you mix quite small amounts. I seemed to managed to get as much of the resin and hardener on my hands as in the tiny mixing dish which comes in the box. When I finally got the resin and hardener mixed, I dropped and lost the syringe with which the water can be placed precisely on the terrain - and had to hunt for an old one.
Anyway, I finally got to the point of mixing the “water” with some dark, smoky Vallejo paint (Vallejo Black/Russian Green/ Green-Brown mix), stirring the paint slowly into the mixed “water”. Another helpful tip for me to remember – never, never, never use a brush for this which you love and treasure, as the mixed “water” will utterly destroy it. How many decent brushes did I ruin last night thinking I could clean them perfectly later? Only three, thanks for asking!
The mixture, looking suitably dark and muddy with the Vallejo paint added, is then slowly injected (trying to avoid air bubbles) into anywhere you want the water to be on the terrain board – shell craters, broken parts of the trench where the duckboards have come away, or by the side of the duckboards. This was actually a fun part of the terrain finishing, working out where the “water” looked best.
Each packet of Solid Water gives you enough for about 80-100ml of mixed “water”, so there should be more than enough for a 2 x 2 foot terrain board, unless you’re trying to model the Pripet Marshes or the Grimpen Mire. One handy tip to remember is to keep a spirit measure handy. My guess was that the table I use for modelling was dead level, but it was good to have a spirit measure to hand to prove this. When the Solid Water dries/ cures, it really isn’t coming off, so its best to check everything is level first. It’s then best left for 24 – 48 hours to set hard.
So, here’s the final free-standing terrain base taken from directly above so you can see the trench layout, with another photo of the Glasgow Copse base along-side. In the end, I thought that the bases when placed together looked OK – not ideal, but passable.
All that’s left is to finish the inserts for Glasgow Copse and paint up some of the detritus and paraphernalia for the trenches generally. Oh, and of course to take them to the club for a game on Tuesday night!
Tuesday, 31 May 2011
Glasgow Copse
I had a very enjoyable Bank Holiday weekend finishing off the wooded terrain board and free-standing trench board I’d blogged about a week or so back. I also made a couple of inserts for the wooded board, of which more in a later Blog post.
In case you were interested in the finished wooded terrain board, here it is...
The paints used were mainly household emulsion and some acrylic craft paints called “Louvre”. For the fine detail painting – the corrugated iron, the trench boards and the fallen leaves, I just used Vallejo acrylics. I don’t normally bother varnishing scratch-built terrain, but I ran a quick coat of matt varnish over the plastic-card corrugated iron.
Here’s some more photos, all “staged” as I’ve not yet run a game on the board yet.
I thought the destroyed heavy machine gun based looked quite authentic.... a reassuring sight for any British, French or American player!
And some less reassuring sights for British, French or American players....
Eingreiftruppen advancing
Nemesis of the British subaltern....
German NCOs organising the defence
German field commanders watching and waiting...
A German sniper stalking his prey...
Hope you enjoyed these....next up the finished free-standing trench board.
Wednesday, 25 May 2011
"Only the Dead Have Seen the End of War"
Lard Island was plunged into pitch darkness last night as we play-tested some new night fighting rules for “Through the Mud and the Blood”. I’m very keen to try and add a couple of night actions to the Mud and Blood supplement I’m writing and while the night fighting section in the main rules is a great start, I feel they’re the start of the journey and not the final word.
I was also keen to try out some ideas which have been floating around on the Blogosphere for a few months, courtesy of the hugely prolific Porky. I was particularly interested in his post from 22 February 2011 in which he discussed adding uncertainty and random elements into a wargame.
In that (really excellent) post, he wrote : “What we need is more shock, more horror, more blind terror. I'll bet you haven't felt much of that rolling dice. I haven't. It might do us all good.” His idea of a challenging game is a focus on an “almost total random determination of set-ups and appearances, with a lack of information on as much as possible.”
This sounded about the right tone for a frantic, desperate night fight in the Ypres Salient. There were a number of elements in his blogpost that I felt came close to the chaos of night actions in the Great War - the uncertainty of where the enemy was (or even where your own side was), the difficulty of rallying troops and locating your objective in darkness and while under fire (random or otherwise). A random, chaotic, disorientating environment in which the participant’s nerves were on edge.
With that in mind, here’s what I came up with......
Somewhere in the Ypres Salient, Night (9pm), September 1917
An attack across No Man’s Land by “A” Company of the 17th (County of London) Battalion of the London Regiment (Poplar & Stepney Rifles) 30 minutes ago to capture Glasgow Copse has broken down. German defenders on the outskirts of the Copse have held on despite heavy casualties. The initial British barrage on the German wire and trench saps has not fully neutralised German defenders. “A” Company’s attack has stalled, and the surviving troops of the 17th (County of London) Battalion of the London Regiment (Poplar & Stepney Rifles) have fallen back in disarray. Several sections are rumoured to be pinned down under fire in No Man’s Land. Here’s the view from the German saps just in front of Glasgow Copse...
The commander of “A” Company, Captain Jasper Limehouse, is missing after leading the attack. Most of the junior officers and NCOs in “A” Company have been killed or wounded in the action. Making this difficult situation far worse has been the shelling of the area in front of Glasgow Copse by gas munitions fired from both sides. As the rain starts to fall again over a sodden Flanders, the unmistakeable smell of mustard and fresh hay (from mustard and phosgene gas) lingers over the shattered battlefield.
This was the situation confronting the British players (Rob, Elton and Panda). Each player controlled a junior officer or NCO and would use that figure to move forward in the darkness to locate pinned down British soldiers, collecting any stragglers along the way, and attempt to lead those troops forward in a night attack on two German saps leading out of Glasgow Copse. Rather than knowing what troops they commanded, each player had to locate troops on the battlefield, rally them, form a coherent plan of attack and lead his men forward. From my reading of “Six Weeks” and a few other Great War books, this sort of chaotic battlefield – where officers had to rally troops and lead them forwards - was far from unknown.
As a secondary mission, the British players needed to find Captain Limehouse, who had been lightly wounded and (unknown to them) was pinned down somewhere in No Man’s Land by a German sniper.
The German players (BA and Biffo) had the task of defending their saps and also repairing the barbed wire in front of their positions during what they were (falsely) told was a lull in the fighting. The Germans had fewer troops than the British, but they did at least have the luxury of knowing where those troops were to start with.
How random is “random”?
All units, regardless of being British or German, were rolled up randomly (producing between 6 to 8 figures, with varying weapons and ammunition, and with varying amounts of “shock”). Officers on both sides had a variable number of flares for a flare pistol (1D4) and the German Fahnrich had two large flare rockets which could be fired. Each of the three British Big Men (Second Lieutenant Charles Whitechapel, Sergeant Alf Blackwall and Corporal Vincent Shadwell) needed to search for their troops in No Man’s Land. The precise location of the leaderless British units in No Man’s Land was entirely randomised. Each crater searched would yield a card (randomly drawn). The cards stated the contents of each crater – these totalled four leaderless British units in various states of “shock”, a variety of wounded British and German soldiers, the lightly wounded Captain Limehouse, a variety of abandoned weaponry (some useable – determined randomly), a lingering cloud of phosgene or mustard gas resting in the crater (determined randomly), some very large rats and some hideous corpses (the last two of no effect).
I was hoping what while the players would construct a rough plan of attack, the random element of the game would add a lot of unpredictability. For example, here Second Lieutenant Whitechapel leads two sections forward, a far larger formation than he would normally personally command himself in “Through the Mud and the Blood”...
During the game we also worked on some specific night fighting modifications to “Through the Mud and the Blood”, which I shall post later this week on this Blog. Huge thanks here for all of the players and particularly our great friend, Rob, who was visiting for the evening from his local club and supplied some first-class suggestions.
The Game
In many ways the game was a successful recreation of night fighting. It was a fumbling, unpredictable, frustrating stumble though gas drenched craters coupled with a series of incredibly savage close assaults between the two sides in which the opposing sides’ bombers were clearly in the ascendance. Any co-ordination of the British side was very difficult owing to British players battling to find their troops (I rationalised that the multiple officers’ whistles up and down No Man’s Land were confusing the location of the officer’s for the leaderless groups of stragglers to find). The Germans attempted, logically, to funnel the British into the centre of the table and protect their own flanks – a tactic which was proved possible on one side where the Germans were more numerous but not the other (where the British were stronger by pure happenstance).
There were a number of very cinematic moments – British troops stumbling into craters filled with mustard gas; Captain Limehouse being first found and then wounded again leading an assault against the Germans and eventually captured, a lone German sniper calmly picking off British troops illuminated in the white ghostly light from a flare pistol....
Here are some more of the images from the action:
A ligtly wounded Captain Limehouse is located and brings forward a group of stragglers...
German sections prepare to ambush Captain Limehouse in a crater...
Germans stalking, a sniper on their left flank ...
Crater fighting as two opposing sections fight it out. The British make their advantage in bombers count....
On their right flank, Germans drive some of the British back to their lines, carrying the position and capturing Captain Limehouse...
...while on the German’s left flank, the British advance...
In fact the action was so chaotic and uncoordinated that creating a logical narrative out of the game would be very difficult. In that regard I’ve come to the conclusion that the game was a success – even if it lacked the grand narrative sweep of some of the other games.
What next for Glasgow Copse?
I’ll post the scenario and play-test night fighting rules over the next few days. The new terrain for Glasgow Copse is almost finished....
....so you can all expect to see another game of “Through the Mud and the Blood” here in June as the British attempt to push into the Copse during the night.
Subscribe to:
Posts (Atom)