Showing posts with label Trenches. Show all posts

Sunday, 18 March 2012

Trench Loot


I’ve been working on a few additions to my Great War stuff amongst building up the Dark Age forces. I’ve also managed to get a few trench raiding games in over the last couple of months and it’s spurred me on again in the direction of doing some German trench raiding parties and a few extras for the defending British forces. One of the things I was keen to try was a couple of trench raids in which the attackers could try and collect “objectives” in addition to completing their mission determined under the TooFatLardies’ Winter Sports supplement for “Through the Mud and the Blood”.

These objectives would be items of military importance, but as it was dark and soldiers being soldiers, there was a good chance of some loot being included in the night’s haul. I doubt there was many troops who could turn their eye away from an interesting souvenir. Here’s what a young George Coppard was doing in 1917:

“I decided to jettison my souvenirs weighing nearly twenty pounds which I had been lugging around in my pack. German fuse tops, funny shaped bits of shrapnel and a rusty saw-edge bayonet were among the collection of old iron. Why I had been torturing myself with agonizing load I don’t know, just a boyish habit of collecting something out of the ordinary, I suppose.” “Boy Soldiers of the Great War”, Richard van Emden, (p95).

So, with that inspiration, here’s six objectives from a British trench which I came up with for my German trench raiders. Some are militarily valuable, some useful, others ... well, you decide


So we have – a pair of British trench maps, with German trenches shown in red and the British forward positions simply delineated in a single blue line.


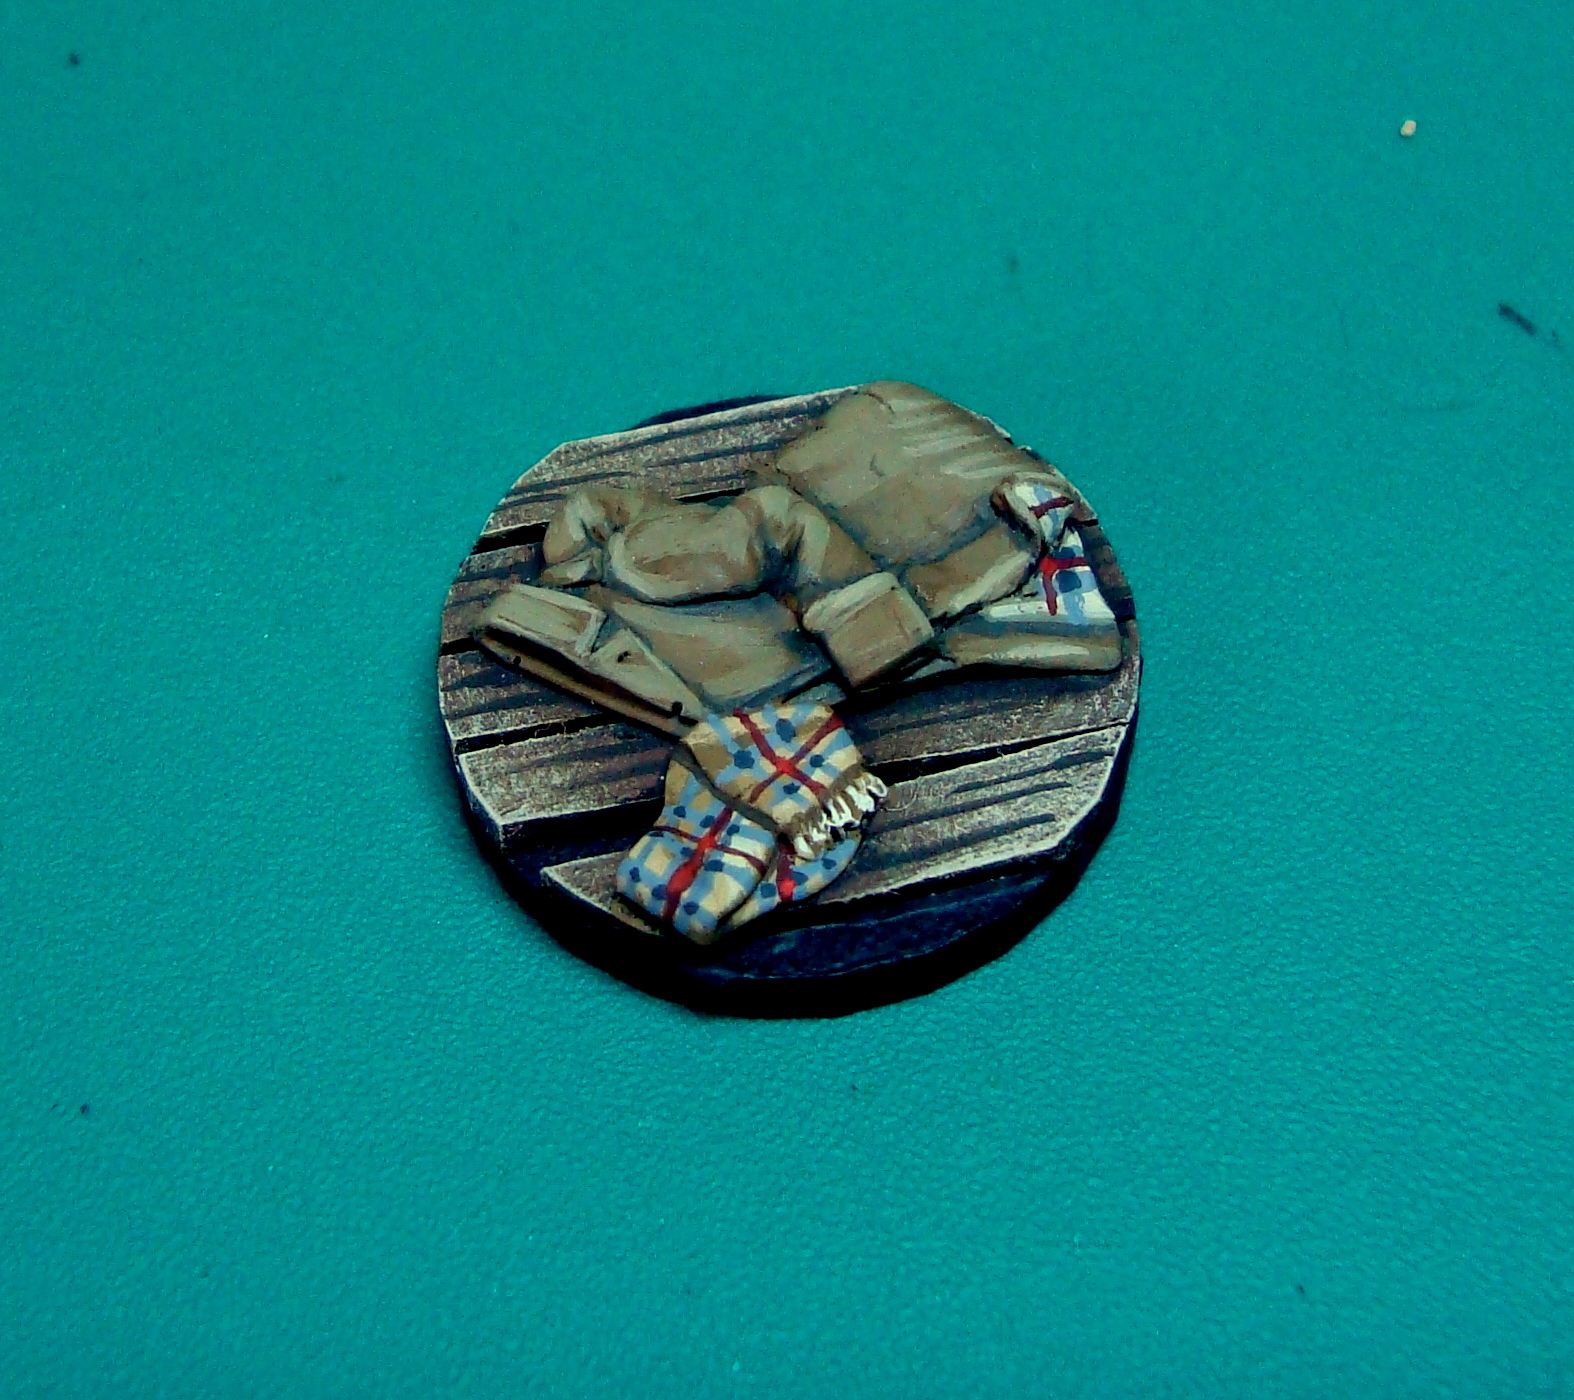
A very smart Burberry trench coat and scarf. No military value, but it’ll be a hit with the Belgian ladies in Bruges ...


A couple of cases of carrier pigeons – clearly valuable military loot


A field telephone – again, something which GHQ won’t be happy has gone walkabout


A collection of fine Scottish Malts imported from Jenners. Military value? Of course!!!


A kettle. Well, I guess the German kettles have been turned into an U-boote ...


So the idea was really to add a bit of colour in the tabletop trenches producing some physical items rather than just card counters. All of these were basically made out of scrap cardboard, wire, tin-foil bottle tops, green-stuff and grey-stuff and some items from the bits-box and it was a lot of fun making them.


The only really tricky thing to make was the pigeon. I won’t tell you how many attempts there were before I settled on the final one.


I also finished off a British version of the “Communications Down” figure I’d made for the Germans a while ago. I wanted to add a card into the card deck of “Through the Mud and the Blood” for British Communications breakdown, and wanted to field a figure on the tabletop to show this visually. So, here he is, converted from one of the wonderful generic casualty figures from Silent Invader over on the (most excellent) Lead Adventure Forum:


Next up - a look at some British casualty figures and battalion stretcher bearers. Hope you can join me later for that.

Sunday, 5 June 2011

No Man's Land Terrain: Free-Standing Trenches - Project Finished

I finished off the "Winter Sports"/ No Man's Land free-standing trench terrain board late last night, after what seemed like an eternity of dry-brushing! I found it very difficult to get the board finished quite as I wanted, and I thought I’d pass on a few of the (hard and bitter) lessons I have learnt!

To start off with, here’s the finished board...


That doesn’t seem too difficult, does it – “how on earth was that so difficult”, I hear you ask. Well, I don’t quite know what went wrong, but here’s some clues.

1. Don’t just have a starting Plan – remember to make notes as you go along.

One of my big problems in painting the free-standing trench board was that I’d finished the Glasgow Copse/ Wood board the weekend before without making any notes about which paints I’d used. This shouldn’t have been a problem, except that I had about three different grey paints and two different brown paints and I tend to mix them all together to get the right shade. I thought the Wood looked about right, but (DOH!) I had forgotten to note down how I had got the colours I aws happy with. For a good couple of hours on Friday evening and yesterday morning, nothing I mixed was looking right.

I’d started from this point...


..and finally got to about this point after much bad language, bitter regret and bashing of my head against an invisible wall.


So, Lesson Number 1 for me to take away is – don’t just make a starting plan – remember to make a few notes as I go along.

2. Try something different now and again

These were the 17th and 18th terrain boards I’ve done for the St Albans TooFatLardies’ Great War project. So I should have a clue what I am doing by now. However, I’d noticed in some of the other trench boards that the corners of the trenches and the base of the trench walls were not – how can I say this – grubby enough. They looked a bit clean. I’d had no success trying to paint a water-based dark brown or black into the nooks, crannies, crevises, gaps of the trenches. The paint just didn’t seem to flow into the spaces until I switched to a very dark brown enamel paint/ white spirit mix, which flowed in nicely.


It’s the first time I’ve used spirit based paints on a terrain board and I liked the result. Lesson Number 2 for me to try and remember - Try something different now and again: Don’t just stick to what’s worked before.

3. See the world from a different angle

After what seemed like hours of dry-brushing of the trenches and surrounding ground, I wanted to try and paint some of the detail in the trenches like the corrugated iron (made out of corrugated card), broken duckboards (made out of artists mounting boards) and old ammunition boxes. This called for a much more delicate approach than I like to use for terrain, and was well-nigh impossible until I tilted the base completely on it’s side allowing me to get to the details I wanted. Lesson Number 3 – I need to remember to see the terrain from a different angle if I get stuck.

Here’s a picture, taken from one of those odd angles made possible by the terrain board being at a 90 degree angle.


4. Black(Dark)water

Finally, late last night (and after three bottles of Hoegaarden and a pretty good episode of Wallander on BBC3), I decided to add in some water effects. The product I like to use is called Solid Water, a two part clear exopy (two parts resin, one part hardener) which dries rock hard and is very durable. It looks good when it’s dried, although it does take a considerable time to dry or “cure” – I’m not sure what the right phrase is.


I’ve used it before, no problem, but last night it just seemed to be a lot more tricky to use. I blame the Hoegaarden! The Solid Water has to be mixed, and the syringes which come with the product only allow you mix quite small amounts. I seemed to managed to get as much of the resin and hardener on my hands as in the tiny mixing dish which comes in the box. When I finally got the resin and hardener mixed, I dropped and lost the syringe with which the water can be placed precisely on the terrain - and had to hunt for an old one.

Anyway, I finally got to the point of mixing the “water” with some dark, smoky Vallejo paint (Vallejo Black/Russian Green/ Green-Brown mix), stirring the paint slowly into the mixed “water”. Another helpful tip for me to remember – never, never, never use a brush for this which you love and treasure, as the mixed “water” will utterly destroy it. How many decent brushes did I ruin last night thinking I could clean them perfectly later? Only three, thanks for asking!

The mixture, looking suitably dark and muddy with the Vallejo paint added, is then slowly injected (trying to avoid air bubbles) into anywhere you want the water to be on the terrain board – shell craters, broken parts of the trench where the duckboards have come away, or by the side of the duckboards. This was actually a fun part of the terrain finishing, working out where the “water” looked best.


Each packet of Solid Water gives you enough for about 80-100ml of mixed “water”, so there should be more than enough for a 2 x 2 foot terrain board, unless you’re trying to model the Pripet Marshes or the Grimpen Mire. One handy tip to remember is to keep a spirit measure handy. My guess was that the table I use for modelling was dead level, but it was good to have a spirit measure to hand to prove this. When the Solid Water dries/ cures, it really isn’t coming off, so its best to check everything is level first. It’s then best left for 24 – 48 hours to set hard.


So, here’s the final free-standing terrain base taken from directly above so you can see the trench layout, with another photo of the Glasgow Copse base along-side. In the end, I thought that the bases when placed together looked OK – not ideal, but passable.


All that’s left is to finish the inserts for Glasgow Copse and paint up some of the detritus and paraphernalia for the trenches generally. Oh, and of course to take them to the club for a game on Tuesday night!


Tuesday, 17 May 2011

No Man's Land terrain and a few loose ends

Just a quick couple of updates of what I’ve been up to this week, and to start to tie up a couple of loose ends on this blog.

First, I’ve really being enjoying “Six Weeks”, which I mentioned in my post here. I’m about two-thirds through, and I shall let your have a proper review later this week. For a wargamer, there’s a great many insights and ideas which come from the book. It’s certainly worth the price for that reason alone. Perhaps far more importantly, though, in addition to being an excellent historical account of junior British officers in the Great War, the book is a deeply moving, sometimes harrowing and very respectful tribute to the sacrifice of those officers.

Second, and on a terrain making note, I’ve been finishing off the wooded terrain for No Man’s Land which I started in March. After a period of painting figures, it’s been great to come back to some terrain making.

You might remember I got to this point by late March ...


As always, I started with a plan of what needed to be done to carry the project forward. I always think that this helps me get over the “Oh Lord, it’s all too difficult stage” when going back to a half-finished project.


One of the first thing I wanted to do was to make the trees look a little more varied and less “stick-like”. I bought some plastic, bendy tree armatures a while back and these are great for bending into various shapes. They were perfect for the smaller branches which may not have been removed by the shelling, and made the trees slightly more varied.


I drilled the sticks with a fine hand drill and then glued in some small armature branches with epoxy resin (less brittle than superglue, as the trees may have a fair bit of handling at our local club).


Next, I wanted to make sure that the wood locating battens into which the wooded squares can be slotted were not too obvious and pronounced. I like using Milliput for this sort of thing - its pretty cheap, very hard when dry and easy to mould into shape. Although Milliput is a rough epoxy putty, as it was going to be covered in PVA and gravel scatter, that didn’t matter in this use of the material.


I wanted some variety on the “woodland” floor as well as in the trees. I cut some tufts from an old piece of rubber-backed floor matting and cut some suitable grass patches from an old set of towelling which I had dyed dark brown.


Then I rustled up a disgusting mixture of dark brown paint, polyfilla and PVA glue in an old contained which I spread onto the terrain board, wood sections and foam inserts with an old brush. I tend to do this pretty liberally, as the polyfilla adds a slight contour.


The, as with the other terrain boards, I scattered loose gravel and sand over, and pressed the brown towelling patches into, the brown PVA sludge. That got me to this point....


I was reasonably pleased with this interim step and felt that things were coming together. As you can see, the idea is to get a double use out of the woods – so they can be used on a normal non-modular terrain table, as well as each having a custom place slotted onto their home on the terrain board.


With the prototype shell-shattered woods I’ve made before, I’ve coated them liberally in PVA glue to prolong their lifespan and rough handling at the club. I did the same with the wood squares, mixing up some PVA, a little polyfilla and black paint in order to paint the trees. (For obvious reasons, this is best done after you have finished scattering gravel around!)


So, at this stage, things were coming together....


......which means that the last stage before painting is some detailing. I’d made a couple of interchangeable machine gun/ mortar/ command pits in the terrain board, and wanted these to have some sandbags around. There are loads of great tutorials on the internet telling you how to make these, so I won’t repeat the advice here. Suffice to say I made the sandbags with Miliput, pressing them out using a cloth (to indent a fabric pattern on the putty) and finished the detailing using a sculpting tool and a pin.....


OK, I’ll accept that the pin might have been going over the top a little ! That being said, I thought that adding the sandbag stitching was a fun thing to do on a couple of the sandbags. Finally, I wanted to have some of the trees with longer roots, again trying to make them seem more natural. I’d tried to do this on the Bourlon Wood test-piece I made a year or so back. Here’s where I got to this time....


So, there we are. Building done, with just the painting to do and then some micro-detailing. Hope you can join me for that this coming weekend.

Sunday, 15 May 2011

A Quick Update on Slooow Progress …

One of the things I tend to forget about making terrain after not doing it for a while is that it does take a while to get anywhere. And annoying little things always seem to conspire and get in the way – like having to go into work today on a Sunday (OK, OK, cue violins !)


So, in other words, I got a decent start on the second of the special No Man’s Land boards which I’d started in March, but I’ve nowhere near finished. I think all the techniques I have blogged about before, so these are just some pictures letting you see the (slooow) progress so far.

I wanted to try and break up the flat terrain style I’d used before on other trench bases. Contours can be difficult in making wargames terrain, particularly if you don’t have a very large area in which to contour. Too much contouring, and the figures may not be able to stand on the slope – not enough and it just looks flat. I tried to compromise with cutting some foamboard shapes and gluing these to the Styrofoam base.


I then added some more tree armature branches into the shattered tree stumps on the single copse base of the No Man’s Land trench board.


I’d tried on the terrain board to create the impression of hastily sapped out trenches to craters around the old trench system. I wanted to get away from neat trenches on these parts of the board, and therefore revetted these trench sides with corrugated card (representing hastily stacked corrugated iron) and the base of these improvised trenches with resin-cast wicker fascines. I used a generous sprinkle of small pebbles sieved from a bag of builder’s sharp sand to create the impression of repeated shelling, crumbling trench walls and general chaos.


I find it easiest to cut the towelling terrain to shape while the sytrofoam base is free from the PVA/Polyfilla mix. It takes a bit of time to ensure you cut around the various shell holes, trenches and so on.


Then I simply covered the base with the PVA/ Polyfilla/ dark brown paint mix, and sprinkled with gravel and sand.


That leaves a lot more greenstuff sandbags (a.k.a. the return of the very small sculpting pin!), and the extra detailing I want to try and do on this base in particular. It’s hopefully going to be a busy terrain-making week!
Related Posts Plugin for WordPress, Blogger...