Tuesday, 27 April 2010

WHOOPS.....Apocalypse!

Back in the early 1980s, when I was just starting to discover the joys of drainpipe jeans, Dungeons & Dragons and supporting Hull FC, Games Workshop brought out a fun little boardgame called “Apocalypse: The Game of Nuclear Devastation” in which you could wipe out most of Europe with funky stacks of nuclear missiles while enjoying your Indian takeaway on a Friday night.


The game fitted perfectly into the paranoia of the time – would we all be blown into atoms by a nuclear holocaust as soon as Ronnie Reagan was elected, or would we actually manage to live long enough to see Revenge of the Jedi at the cinema? It didn’t really feel as if we were living on a knife edge, although there was just this nagging fear that one frustrated NORAD computer having a seriously bad day could totally mess up our role-playing schedule for the next few millennia.


I first played Apocalypse at the School Wargames Club....Room J7 if I remember correctly on a late Friday afternoon sometime in 1981. I had a blast, most of which came from the pleasure of launching nuclear weapons at your mates and obliterating Vienna. Hey, I never liked that Ultravox record anyway.

I owned a copy of the game in the 1980s and played it a lot at University. It always entertained me that one of the most enthusiastic players was a friend who was a diehard CND supporter – I remember he said it showed “the futility of nuclear war....no winners...blah, blah”. But I always had a sneaky suspicion he just liked obliterating the Low Countries with a three inch nuclear warhead stack. Sadly, I sold my copy of Apocalypse in my Great Boardgame Purge of 1996. The game fetches a fortune on EBay now (and far more than the £10 I sold it for), but I’ve mentioned to a few of my chums that I thought the European devastation theme fitted well with my current Great War interest and that I'd like to try the game again sometime.

Following on from Salute on Saturday, my old wargaming chum from the Humberside club, Mike Brown, and his son George, came to stay for the weekend. I’d originally intended to get all the trench boards out for a series of “Through the Mud and the Blood” games, but we opted for a barbecue on the Saturday evening instead and Mike brought over his copy of Apocalypse.

We played a game after the barbecue, and the years came flashing with memories of Classroom J7, the days of Hull FC still being at the Boulevard, my student housemates and, for some odd reason, all those really catchy Yazoo songs from about 1982.

Things I remembered liking about Apocalypse #1: Simple rules. Three pages only. You can read them in the time it takes to eat a post-barbecue tiramisu.

Things I remembered liking about Apocalypse #2: Elegant strategies. There’s a funky system in which you effect combat between armies which involves choosing a number on a dice (instead of rolling it) while your opponent guesses the number. You have various armies in your province, but only the number of armies equal to the number you chose on your dice can enter the province you're attacking. If your opponent guesses the number correctly, you’re defeated, but you only loose the number of armies you attacked with. OK, we’re not talking Paths of Glory here, but it is fun, gives rise to a lot of bluff between players, and after a late afternoon’s drinking at the pub following the Salute show was just about all I could manage on Saturday night.


Things I remembered liking about Apocalypse #3: NUKES!! Oh yes, building the stacks of nuclear warheads was awesome when I played in the 1980s. And unlike listening to most Brit Synth-Pop of the 80s, it still is fun. You get a missile for each successful conflict, and the stack grows higher and higher. So, here’s the Minsk Monster pile of warheads Mike constructed.


Things I remembered liking about Apocalypse #4: Unleash Hell. You always seem to get to the point when everyone has a stack of missiles. Some large, some small, usually dotted around the capitals of Europe and they inevitable destabilise the game. You simply can’t have an opponent sitting around with a missile threatening your attack into the Carpathians, can you? So it’s time to open the silos for a pre-emptive strike. War, huh...what is it good for? The aim is really to set off a chain reaction as your opponent’s missiles are blown up, killing his armies and ideally blowing up everything around as well. All of which tends to completely undermine the theory of Mutually Assured Destruction. But hey, that’s just part of the game – there’s even rules to clean up the nuclear wasteland afterwards, so you can feel sort of liberal and moral while playing the game if you really want to. I don't think we bothered with cleaning up after our nuclear holocausts, however. Anyway, here’s my stack in Rome about to be obliterated by the Minsk Monster....


Things I remembered hating about Apocalypse: Oh well, there’s only one. And it’s that the game just goes on, and on, and on. It’s very difficult to play the victory conditions in the game, which simply say something like play until you’re the last one left alive. We played until most of Northern Russia, Italy and Central Europe was obliterated and covered in a nuclear winter, but even then we had the feeling that we could have carried on well past the early hours on Sunday morning. I guess in the early 1980s, with only three television channels in the UK, few videos, no computers and no internet boardgames just took longer. Why hurry when the best thing on TV after midnight was the test card?

So there you have it...”Apocalypse – The Game of Nuclear Devastation”. Designed by Mike Hayes, released by Games Workshop in 1980. Total Win. And far more fun than a nuclear war.

Monday, 26 April 2010

Salute 2010

On Saturday I went to Salute 2010 at Excel with a few of the other members of the TooFatLardies. This was the first year since 2005 that we’d put on a game, mainly I think because after 5 years of participation gaming we fancied a break this time round.

I can’t deny that this was a pleasant change for me after preparing the terrain for the “Through the Mud and the Blood” Western Front game last year. So, with no last minute terrain making and miniature painting deadlines I was really look forward to the games on display and the fantastic show that the Warlords always put on.

If you’ve never been to Salute in its new docklands setting, I would highly recommend a visit. The space is open and light, there’s plenty of room to move around and just about every wargames manufacturer, terrain maker and rules writer either has a stall or is playing a display game. Sure, people still have some legitimate concerns – the expensive car parking, the fact that the UK’s biggest wargames show is still in London and not somewhere more central, the perception by some people that the atmosphere is not quite what it was at the multi-level Olympia venue. While I appreciate the concerns, I still think that the Salute shows at Excel have never been less than memorable and enjoyable. A huge thanks here is due to the South London Warlords (thanks, guys), but “A Big Pat On The Back” is also owed to every participator who’s games bring the whole event alive and make it a great day out.

OK, so what did stand out this year for me? I have to admit a certain weakness at this point. Over the years I’ve gamed dozens of periods, but I tend to be pretty impressionable and get drawn to the games and periods which reflect what I’m doing at the current times. So my digital photo albums from the early 2000s are full of display games from the 17th Century while I built my Williamite armies. And then it was Samurai and fantasy games I focused on when I was building my Medieval Japanese army. So, this time around, it wasn’t perhaps so surprising that I made headlong for a very attractive game set on the first day of The Great War, the spectacularly named “My Feet Hurt, Mum” which was put on by the Gentlemen of the splendidly monicker-ed South East Essex Military Society.


From what I could see from a few visits to the table, it was an opening engagement between German and Belgian forces on the edge of a Belgian town. The excellent terrain was scratch built on a builder’s board even harder than the Styrofoam I’ve used, and complemented by some fine buildings from Grand Manner.


The figures were, I think, mainly Brigade Models’ line of Early War Belgians and Renegade Early War Germans, but the trucks and wagons were scratch converted and supplemented by some very nice vintage Matchbox cars from the “Models of Yesteryear” range.


As you can hopefully see from the photos, the whole effect was a really awesome table, with plenty to catch, but overwhelm, the eyes. My favourites would be the lovely 1/48th scale monoplanes, the limousine of the Belgian Colonel (carrying his Mistress whom I was informed by the South East Essex chaps was called 'Mademoiselle Tottie') and the vegetable plots to the rear of the houses featuring some great miniature cabbages made from Wedding cake decorations (hmmmm....must search those out).


One of the nicest things about the game was the spirit in which the game was being played and also the friendly, warm welcome the South Essex chaps were giving to everyone visiting the table. It was a relief, though, that Richard and myself were not offered a sample of the Belgian Officer’s hip flask on drawing the “Time for a Snifter card” at 10.30am on Saturday morning.

A few dozen light years from the setting of “Through the Mud and Blood” is the new boardgame of “Incursion”. This is set in a Weird War Gibraltar with dozens of zombies and Weird War stormtroopers attempting to massacre hyper-armoured GIs in the tunnels under the Rock of Gibraltar. Hey, it may not be The Great War, but what’s not to like about that setting !! Wandering over to the “Incursion” game table at Salute I found a Lardy chum, Mike Brian, shaking dice like a demon and running one of the games on an absolutely awesome table which looked just perfect and fitted the mood of the game brilliantly.


Mike’s long time visitor to Lard Island Games Days and despite being a bloody good bloke and all round top guy is just about one of the most unlucky gamers you could ever have the privilege to play against. I declined to ask if his zombies had blundered into a minefield as most of his troops seemed to do whenever I played him, but he looked to be having a good time. Hope your zombies had some brains for lunch Mike...


After wandering about the rest of the show and making a final visit to Great War Belgium with the South East Essex chaps, we headed off to the pub for lunch. The photos, I think, tell their own story.


Tuesday, 20 April 2010

Planning a Fortified Village

Welcome back! And for those visiting for the first time....what kept you?

One of the terrain items I was looking forward to adding to the Trench Terrain boards we built for the Salute 2009 game was a small village, placed close to the front line. The more I had read about The Great War, the more I was intrigued by how the different combatants on the Western Front, and the particularly German armies, sited their defensive strongpoints on villages, hamlets and wooded areas, and interwove these strongpoints with trench lines. I found some fine descriptions of these arrangements in Jack Sheldon’s books “The German Army on the Somme” and “The Germans at Beaumont Hamel” and also in Terry Norman’s excellent “The Hell They Called High Wood”.

As I read thorough the description of the German defences at locations such as Beaumont Hamel I was interested in the way that the cellars of the village houses had been tunnelled through to interlink with the German front line trenches. This made the villages formidable defensive points, capable of holding up attacks for a considerable time. And so an idea was forming to construct a shell damaged village which could be used as major strongpoint in a trench line game.

Following the shows at Salute in March 2009 and Partizan in May 2009, Richard Clarke, Nick Skinner, Mick Tucker and I had also planned to visit the Crisis show in Antwerp in November 2009. The plan was to build a couple of new Trench Boards on which the “village” could be located. I planned to do this during the summer months in which nothing much else would be happening, with plenty of time to spare before the Crisis show. What would be simpler?

Ah, if only I was clairvoyant....

I found images of shell damaged villages from the Western Front depressingly easy to locate on the internet. Some, like the image of Zonnebeke below, simply showed piles of shell shattered bricks and wood. While it would have been accurate to model a completely destroyed village, we still wanted to make sure the game would be attractive to the visitor to the Crisis show. We wanted to catch the eye, and we felt that piles of splintered wood and broken brick walls barely an inch high, while dramatic, wasn’t the “look” we were aiming for in the Crisis game.


You might remember when we built the trench boards we were trying to re-create the type of new, relatively undamaged fortifications from the Siegfried Stellung in 1917 or 1918. It didn’t seem unreasonable to consider that the various lines comprising the Siegfried Stellung could have incorporated a fortified village of the type we wanted to build – damaged, but not yet destroyed.

I then located images from Langemarck and Zonnebeke and some of the other villages around the Ypres salient taken in 1915 and 1916, both on the net and in Peter Barton’s magnificent book on the panoramas of Passchendaele. These photographs showed the villages after some fighting but before the complete obliteration of these communities later in the War. The images (some of which are added below) conveyed the type of damage which we were trying to achieve in our modelling. There was also the added attraction of very loosely trying to copy Flemish buildings, being mindful of the Crisis 2009 show being set in the beautiful city of Antwerp.


After deciding on the “look” of the village, I wanted to try and think of a way in which the buildings could be fully integrated into the Trench Boards. I was very happy to place the buildings directly on the Trench Boards when needed, but wanted to try something a little different for a show like Crisis. I wanted to use the depth of each of the board, basically being 40mm of so of Styrofoam, in the same way as we had used it to cut out the trenches.

The idea came to me, oddly enough, when reading through a copy of the “Town Cryer”, a great supplement which Games Workshop used to publish for their Mordheim game. This contained rules for tunnel fighting. I started browsing Mordheim sites on the web and found the Gidian-Gelände website featuring a stunning table built for Mordheim, complete with tunnels, cellars and sewers. Here’s the site – I thoroughly recommend a visit:

http://gidian-gelaende.de/Material_HP/Wolfgang/WIPmortheim/album/index.html

The Mordheim terrain Gidian had built was more elaborate than we needed, but we picked up some great ideas on how to build cellar and link these together (or not) and how to create access from the buildings to the cellars. So, here’s another of my terrain building maxims: “Never be too inventive to forget to learn from the Greats”. So, for the record Gidian.....thanks for the inspiration!

Anyway, in the next few Blogs I’d like to describe how we went about building the village, and how we ended up with our final design. But to let you know there’s an end in sight, here’s some images from the final Trench Boards, featuring the village of Vlissinghe ....


....all quiet before the storm....


.....defended by German stosstruppen.....


......some of which have decided to take refuge in the crypt of the small Flemish Church of Sint-Griete.

Monday, 29 March 2010

Painting the Town Green and Super-Detailing

The final stages in building Trench Terrain are perhaps the most fun of all. Before you paint the terrain, it looks like, well, lumps of card and dyed green towelling stuck to blue Styrofoam. There's nothing much to catch the eye.

It’s time to bring the terrain to life. There are loads of terrain painting guides on the internet and in the Games Workshop terrain books I posted on before. As I mentioned in an earlier Blog, painting terrain needs a different gear to painting miniatures. Think Macro, not micro.

We’re talking here about matt emulsion paint and home decorating brushes instead of Vallejo paints and size 00s. For wargamers used to being bent over at a painting table trying to pick out details of uniforms, it’s actually a really pleasant change. What I also found really useful was the help of friends from the TwoFatLardies wargaming group, simply just coming over and having a beer with a paintbrush in hand.


Painting terrain is a bigger job than painting miniatures, but in my view it should always be approached as a really fun, relaxing, “pressure off” part of the hobby.
The base coat of paint should help blend everything in, but it’s when you start to dry brush the terrain, and the trenches in particular, that everything really starts to come alive. Our base coats were a fairly dull green straight out of the matt emulsion tin for the grass, a dark brown for the shell-craters and dark grey for the soil and rock thrown up around the shell craters. I kept the interior of the trenches a dull brown, and then highlighted with a dusty ochre colour.

I felt after trying a few colour schemes for the trenches that it didn’t really matter if it wasn’t colourful. My reasoning went as follows. Firstly, your carefully painted miniatures will be in the trenches and you don’t want anything to gaudy or bright in the trenches to detract from them when people are watching or playing the game. Secondly, the main thing to remember about painting the trenches is to dry-brush and bring out with texture of the mud and the wood planking – and you don’t need fancy or gaudy colours for this. Remember to also try some dark rust/ brown paint washes for the rust on the corrugated iron.

The towelling should be dyed green already, and the PVA/ Interior Filler mix will have seeped into the towelling giving a rock hard base. This is a great, sturdy gaming base. But being a bit paranoid about how the terrain would fare in a year of heavy use and touring round different shows, I wanted to make the terrain as durable as possible. I therefore mixed some neat PVA with a base dark green paint to cover the towelling. I’m not sure this is essential, but it makes the towelling incredibly rigid and durable. Basically, once it’s glued down and covered with PVA/ paint wash, the towelling is going nowhere for a decade at least! Dry-brushing with neat green and ochre shades looks good, especially when finished off with some poppy scatter.

The following action from one of the pre-Salute 2009 games should give an idea of the final colours we used. First, an overhead view of the trenches with the German defenders under pressure from "C" battalion of the Royal Tank Corps....


....and then a close-up view of the trenches, with the German eingriffkampferen streaming forward to stem the Royal Surreys' attack...


Super-detailing, or “Can you see my signal rockets?”

What we did after finishing the basic trenches was take a break and play a few games. We got the feel of trench wargaming and started to think about whether we wanted any extra boards or whether we wanted to make any new large scale terrain items. While we were deliberating, I started adding some super-detail to your trench system...all the little items which makes the terrain come alive.

My maxim here was "catch the eye, but not too much". Personally, I think this is one of the nicest parts of finishing a project – coming back after a month or so and making just a small detail to enhance the overall shape and appearance of the terrain. But I didn't want to overwhelm the overall look of the Trench Boards with too much going on. I had in my own mind some large additional centrepiece terrain items (which I will be posting on later this Spring in part 2 and part 3 of this Blog), so anything going into the trenches as additional small terrain items needed to be eye-catching, but not over-powering. They needed to be something which people would like to see when they caught sight of it, but not something which unbalances the overall effect in the game. Super-detailing is quite a personal choice, and that was mine.

So, here, in that vein, are some SOS signal rockets made from scraps of balsa wood and some barbecue skewers just by the entrance to a Stellungsbattalion bunker. You can also see a pile of boxes and a large rat from Pardulon Miniatures (www.pardulon-models.com) watching the action.


Some other things I've made since have been various boxes of stores, a pile of hand-grenades at the ready and a couple of casualty figures to specifically fit within the front trench line. Here's one I called "Communications Down"...


And here's a selection of other German Stellungbatallionkampfer casualties to lie in the front line trench or the space between the front line and the support line trenches....


Well, that's the end of Part 1 of the Blog. Trench terrain is not anymore complicated or expensive than normal wargames terrain. Basically, at least in my book, it can be as “cheap as chips” (I’m from Yorkshire, after all), but it does take a while, simply because of the scale. However, if you have the space to try it, friends to help you out and an adventurous approach, I'd venture to say that absolutely anyone reading this Blog can make something just as good as what we produced. As I mentioned in the last post, the next few blogs will focus on constructing a ruined village on the Western Front.

Hope you can join me for that.

The Flexible Art of Slotting and Dropping

First, an apology for all who have been waiting patiently for the next instalment in this Blog. Please rest assured that I had not forgotten to update the Blog, but work got in the way of doing this (depressing, isn’t it, how that happens so often). Anyway, I am back and hope to finish stage 1 of the Blog a little later today (covering the Salute Boards). Stage 2 (the boards from Crisis 2009) and Stage 3 (new terrain boards) will follow in April 2010 and later in the Spring, respectively.

And a huge thank you to everyone who has become a “follower” of the Blog and who has left comments on the wargaming sites on the internet. It really is great to hear from people about their experiences of terrain building, particularly regarding terrain from the Great War. Anyway, on with the Blog....

I mentioned at the start of the Blog that we wanted to create the maximum flexibility in our terrain design. Sometimes this won’t always be possible. There might be that scenario which calls for a bunker to be deposited in that odd location on the board, or that shell-shattered wood in just the oddest of positions. But there may be other times that you just know that you want to build in a bunker or a gun position somewhere on the board, but you simply don’t want it there all the time.

Now don’t get me wrong. Of course you can just drop bunkers or strongpoints on the boards anywhere. I’m definitely not the sort of person who would ever think badly of anyone who did that. Quite the contrary, I do it all the time myself. But for the Great War Trench Terrain, I wanted to try and integrate these terrain items into the boards, making them a real feature of the terrain and something which looked as realistic as possible. My reasoning was that since I was trying to create the trenches dug into the terrain, i thought it would be consistent to try and do the same with the other terrain features.

I tried to go about doing this in two ways....

First, for the smaller bunkers which were a feature of the German Stellung in the Late War period, I created an area which could serve as an MG pit. Perhaps this was an old crater in the line which has been reinforced, or perhaps this was a deliberately reinforced area from which a machine gun firing on a fixed line could be situated. I made the proportions of the pit fairly square so I could also slot a small bunker on top of the pit. I also used the Styrofoam cut away from the main board as a base for the small bunker. This enabled me to make sure that the Bunker could be effectively “slotted” in place and would not move during the game.

Here’s a few photos of the pit being created, with some 28mm figures added for scale. I’ve tried to show how the Styrofoam cut away forms the base of the bunker to be placed on top of the pit.


Here’s another shot of the bunker in action, painted and finished with some camo netting and flock and positioned on top of the MG pit. The battle scene is from Crisis 2009. Hopefully you can get an idea of how the bunker can in some games be used to reinforce a flank (here of a village), or a trench support line. Or, if you prefer, the bunker can be removed and the defenders left with a weaker position.


Second, I tried to use the same general principle for creating “segments” to drop into the game boards. This takes a bit more work but in my view is really worth it and adds tremendously to the flexibility of the boards. On the first rank of "No-Man's Land" Trench Boards, I created whole sections which are cut out from the Styrofoam and can be dropped in place. So, when the board is used as no-man’s-land, the dropped segment is a reinforced crater for the attacker’s jump off point. However, when the board is reversed it can be sued as as a rear rank board behind the support trench, with the shell crater segment removed and a segment dropped in place representing a field gun position, a bunker, a casualty clearing station or an anti-aircraft MG mounting.

Here's a picture of the shell crater on one of the rear boards being made.


Next, a close-up of the finished shell crater segement in position "slotted" into the Terrain Board. The rubble in the crater was built up using builder's sand (a coarse, rough sand with numerous small pebbles, and fine talus. The "wood planking" is thick-ish cardboard, and the "corrugated iron" is actually corrugated cardboard. I wanted to try and create a different effect for the trenches leading into the shell craters, suggesting that they'd been hastily sapped forward by engineers...


And then a picture of the Royal Surreys preparing to leave that shell crater during one of the practice games before the Salute 2009 show.


And here's another shot, this time of all the Trench Boards we made for Salute 2009. You can see the three crater segments in each of the Trench Boards nearest the camera - each crater in the segment is surrounded by sandbags and improvised revetting using wooden boards and corrugated iron brought forward in the saps by the field engineers. You can also see how we used these boards as "jump off" saps for the attacker, with some sections with rifle grenades and some command elements being left in the saps as the lead sections close into an assault.


Designing each segment to drop in is good fun, and adds a lot of variety while still being integrated into the terrain. By designing and building different segements you get the maximum use out of the terrain, enhancing flexibility and preserving the effect of features being built into the terrain and not just placed on top of it.

Sometimes the segment can be a mini- terrain feature in this own right, such as this destroyed German MG position I made for our wooded “Copse 125” Terrain Boards.


Tuesday, 16 February 2010

“How green is my (Mash) Valley?”

At this stage, you’re ready to tackle the surface of the boards. And at this point the main aesthetic dilemma arrives. Do you want a realistic muddy trench system, or do you want something which is not just 12 boards painted interesting and slightly varied shades of brown? My question is a little loaded, of course, because we chose the former, not the latter. It was a purely personal choice, and I agonised over it.

On the one hand, no-one is going to deny that the trenches were a place of misery and suffering. Mud was everywhere. In so many ways, a landscape of muddy shell craters half filled with stagnant, poisoned water have become the enduring image in so many people's minds of the First Word War, a signature for the terrible conditions in which the War was often fought on the Western Front. Coating all of the trench terrain boards with interior filler and brown paint would therefore certainly not be inaccurate, and I was very mindful of not wanting to suggest that the no-man’s-land of the Great War was a calming place of swaying grasses and picturesque poppies flowering amidst the barbed wire.

But, on the other hand, there were actions fought over green fields even in the middle of the War, notably the early engagements on the Somme in 1916 and the crossing of the Siegfried Stellung at Cambrai in 1917 (which was not heavily shelled to facilitate the movement of the Royal Tank Corps). I reasoned that our trench system could be one of these locations, where a substantial amount of grass could remain before a heavy bombardment had taken place. This would allow for a mix of muddy shell craters but also some colour in the green of the surrounding grass fields. It was a personal choice, and I know some of you like it and that others are less keen. Well, mes braves, one pays one's money and takes one's choice.


For those of the “brown mud” persuasion, you might therefore like to skip the rest of this blog post and head down to your local DIY store for a large 5 litre drum of “Flanders Mud” paint, with my very best wishes and hearty blessing.

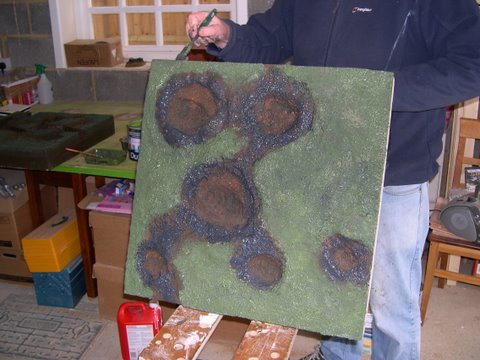
For those of the “green fields” persuasion (or at least those intrigued enough to try), thank you for staying. Here’s how to add the "grass". Before you do, dig out the craters you want to have in the Styrofoam terrain. Just use a chisel....go mad, there’s no magic here. If you want super craters, try building the edges up using offcuts of old Styrofoam from other projects (or from the Styrofoam left over from trenches you have just cut out), cardboard or anything suitably bulky. You can see in the photo below a fairly early stage of constructing one of the "no-man's land" Terrani Boards. I've built up a few large craters using lumps of yellow Styrofoam, applying the PVA/interior filler mix to the craters and edges of the craters. You probably want to learn my lesson in making sure that the bottom of the crater is fairly flat to be able to stand troops up in! We figured that out on the second, and later, boards featuring artillery craters, but the first "no-man's land" Trench Board (in the photo below) is just slightly too realistic in having concave bases to the craters - perfect for prone figures with rifle grenades, but less than idea for standing figures. So, here's another lesson learnt: "rememebr you're building wargaiming terrain, not a museum model". Remember to have a spare old figure on hand to check scale and the ease of positioning of figures on the terrain.


Then get some old bath towelling, basically stuff you’ve wanted to chuck away for ages. Perhaps suggest to your Wife/Girlfriend/Husband/Significant Other that it’s time for some new towels and then take the old ones and dye them dark green. I used DYLON® Dark Green Fabric Dye, which was inexpensive, easy to find and pretty easy to use. Looking back I found that the towels which dyed best were definitely the white and cream ones. It isn’t really that important, as the towelling will be painted over anyway (see below), but it does help.

When the newly dyed towels are dry, cut them to fit around the areas of the board – such as besides the craters and alongside the trench line – where the grass is going to remain present. This is really a trial and error system, and there's a lot of personal taste here. In my view, some boards look better with lots of towelling on them (perhaps a board for a communications trenche). Some boards look better without much towelling at all (the more heavily shelled parts of No Mans Land).


By the time you have finished cutting the towelling, you should have a pattern of green towelling to be placed on each board, ready to be glued down. For the sticking, I'd suggest that you don’t just use PVA glue. You will probably be fine if you do use PVA, but remember that the terrain is going to need to last a long time, and that us wargamers are a fairly clumsy bunch en masse. Try using a 50/50 PVA and interior filler (Polyfilla in the UK) mix and spread this thickly over the surface of the terrain, but not in the trenches themselves (into which you will have glued model duckboards - see earlier blog posting). The PVA/ interior filler mix dries reasonably quickly, and even quicker when you increase the ration of interior filler to PVA glue. Think of the consistency of porridge as what you’re ideally aiming for. Coat this on with a brush across the entire board’s upper surface. Again, think macro, not micro. Then simply glue the towelling down. It helps to "stipple" and "feather" the egdes of the towelling into the PVA/ interior filler mix so that the edges of the towelling cannot be seen when you're looking at the finished terrain boards. Don't worry if this doesn't look quite right fist time, because you can always add a little PVA/ interior filler mix later to correct any oversights.

The PVA/ interior filler mix should really soak into the towelling and dry rock hard. Once the towelling is glued down flat on the terrain, it’s basically never going to be moving again. And hey presto, mud and fields. The photo below gives a good idea of the PVA/interior filler after being speread on the surface of the Terrain Board but before the towelling is stuck down onto it.


While the PVA/ Interior Filler is still setting/drying, sprinkle a variety of stones, ballast, sand on the boards fairly liberally. I started in 2005 with a £5 bag of builders’ sharp sand and that’s still going strong. Just sieve out the stones, dry the sand and its ready. You can also add ballast (such as Talus) from a model railway shop or an online stockist like Antenociti or 4D models, which looks great scattered liberally among the trench craters.


Here's another example of ballast and scatter being glued into a more make-shift trench created between a succession of shell holes.. Here, I glued the "wood planking" (thick cardboard) and "corrugated iron" (corrugated cardboard) onto the PVA/ interior filler and then quickly scattered the sharp sand, ballast and talus onto the still-sticky surface.


A later trick we tried was adding dark grey or brown paint to the PVA/ Interior filler mix. We found this to be a good way of speeding up the painting time by cutting out the need for a painted basecoat in the shell craters and surface mud. You can just see that in the photo above - the grey paint tinge to the PVA/ interior filler can be seen just round the egd of the ballast/ talus scatter. In the photo below you can see the grey/dark brown PVA/interior filler/ paint "muddy combo" being mixed, together with a sample of the different scatterings we dropped onto the board to add the texture to the areas covered with the PVA muddy combo. The different terrain basing elements are (a) sieved sharp (builder's) sand; (b) residue of sharp sand, basically small pieces of rock and pebbles; (c) fine ballast/ talus; and (d) medium ballast/ talus.


This was probably another of those important gamer lessons we learned on building the trench terrain - combine stages to save time where possible, such as adding the paint to the PVA and interior filler. Even if you're not in a hurry to put on a game or attend a show, saving time on terrain projects leaves more time for gaming, going down to the pub or simply re-introducing yourself to your loving family.

By now you should have reached the stage of trenches, grass and craters. And at this point, feel free to have a suitably themed Flemish beer, because a great deal the hard work has been done!

Meeting Your Match

A few readers of this blog, and of my posts on the TooFatLardies yahoo group (http://games.groups.yahoo.com/group/Toofatlardies), have asked a few questions about how all the boards match up, and how they stack together for storing away after a game. Over the past week I’ve found that my written explanations of this have left something to be desired, so I hope that a few photographs with the examples of two finished front line trench sections might help.

The photo below is a picture of ten of the terrain boards stacked under an old wargames table in my garage. They’re resting on some off-cuts of blue Styrofoam to make sure that they are off the concrete garage floor, and also to protect the edges of the boards resting on the floor. I found that the terrain boards stacked better length-wise instead of flat. This was for several reasons. Firstly, there seemed to be much less dust gathering on the vertical board than when stored horizontally. Secondly, we sometimes take just a couple of boards out to play a skirmish game on an evening if gaming friends come round. Although this doesn’t happen that often, it’s a bit frustrating to be looking through a stack of 20 or so boards to find the right one at short notice. The exception to vertical stacking is when the terrain boards are taken to the club or to a show, when they stack horizontally in the car, divided by bubble-wrap as shown with the two boards on top of the table.


When it gets a bit warmer I’m hoping to build a storage rack or cupboard for the boards in the garage, and hopefully blog the results on here.

The next photos show the terrain boards joining up side-by-side, and then a “section view” showing how deep the trench line lies in the board. You can see that the edges of the boards have a sort of “sandwich” appearance. The base is the timber battening, then the middle is the MDF square 600mm x 600mm base board for the terrain, and finally the top is the Styrofoam terrain into which the trenches are cut. You can see how the boards match up to ensure that the trench line runs continuously along the table.


The last shot is of the underneath of the terrain boards. The timber battens reinforce the MDF and give a very stable base for the whole terrain. I found over the years that MDF can warp badly, especially when liberally covered with PVA, paint and polyfilla. I was desperate to avoid this happening. This was one of the main reasons why I battened the MDF to the timber. So far so good. Over 20 terrain bases later, and we’ve had no warping. There’s an added advantage as well. You can see that the underside of the terrain boards creates a space about 40mm in height. When the boards are stacked, whether horizontally or vertically, that space allows a little contouring on the board stacked underneath or to the side. It’s an additional feature which has allowed us to build a few contours into the terrain boards, and exaggerate the jagged edges of shell craters in No-Mans Land, the odd splintered tree stump and so on.

Related Posts Plugin for WordPress, Blogger...