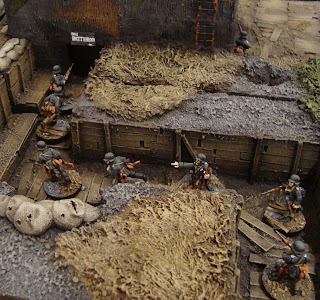
There’s not actually much painting in the
third, and final, part of my series on painting Great War German Infantry. As you’ll remember from last time, the Stellungsbattalionkämpfer figures were at least 95% finished at the middle of last week.
I did, however, get the chance to add a
German command group, and finish some casualty figures which have been on the
painting table for a while.
So, what changes did I actually make to the
Stellungsbattalionkämpfer?
Not much.
All I added to the figures were the painting for the medal ribbon on the
NCO, some Vallejo German Uniform Green piping on a couple of the figures’ cuffs
and some stubble on the faces of the troops.
I wanted them to look a little grimy, perhaps even worn-down, through
being in the front line. This was pretty
simple – just heavily dilute Vallejo black or German Grey (I prefer the latter)
with water. When I mention diluted, I
mean very, very diluted.
You want to almost get to the point that
there’s hardly any pigment in the water.
Then, wash that over the jaw of the figures a few times. The grimy stubble look eventually builds
up. As ever, use in moderation as a
little of this sort of effect tends to go a long way – unless, of course, you
want your frontschwein looking as if they’ve not shaved for several days!
I then finished off a couple of casualty
bases, one with a “shock” or casualty dice in the rear, and one without.
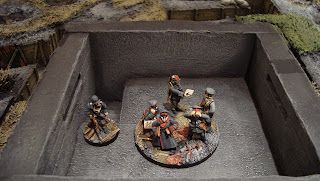
And then I painted through a Great War Miniatures German Command Set. This is really a lovely piece, and was really fun to do. The rather jazzy German officers are taken from the German Army 1914-1918 Part 2 Osprey Man At Arms book. I thought the base could serve as a battalion command, or Kämpftruppenkommandeur figure for larger games and I’d planned to do it as part of the figures to accompany the large bunker, das Rattenkeller, I painted in the early summer.
Then, just for your enjoyment dear readers, I took a few snaps on the terrain that the figures were always intended to inhabit.


Another wonderful and inspirational post, thank you for sharing Sidney.
ReplyDeleteThanks Michael. Not quite up to your fantastic Euro Militaire pictures, but I'm trying!
DeleteGreat info again, Sidney!
ReplyDeleteThanks Monty, glad you liked it!
DeleteLovely stuff again Sidney :)
ReplyDeleteThanks Tamsin, much appreciated!
DeleteNice idea how to add the stubble, I've always wondered how that was done, its so bloody simple, but so effective. Nice one!!
ReplyDeleteYep...simple but it kind of works. At first it looks like there's nothing there, but if you let it dry the layers of diluted paint do add up gradually. Cheers Ray!
DeleteBeautiful work as usual, the stubble tip is genius Sidney!
ReplyDeleteGenius.....naw......I think I discovered it by accident! Thanks fro dropping by, Fran!
DeleteAmazing - your attention to detail is inspiring. Well Done!!
ReplyDeleteFrank
http://adventuresinlead.blogspot.com.au/
Thanks Frank! Great to see you here again!
DeleteFantastic work mate, that command group in particular is fan-bloody-tastic. The figures blend with the terrain superbly, as ever the best WWI figures and terrain around!
ReplyDeleteBen
Ben, that's far too kind, but thank you anyway! Glad you're enjoying it so far!
DeleteThanks Sidney, great stuff again.
ReplyDeleteThanks Rodger! Much appreciated, Sir!
DeleteWhat a wonderful conclusion to a great tutorial Sidney! You keep tempting me with the Great War, but I just manage to resist until I clear some of my current projects. I wish I could concentrate like you to just a couple projects, but I'm to easily distracted!
ReplyDeleteLet the last blog header this one is fantastic too!
Christopher
Thanks Christopher - I'm glad you enjoyed the header for the blog. I had grand plans of changing it more often. I'll try a bit harder in future!
DeleteFantastic figures and terrain. Best, Dean
ReplyDeleteThanks Dean, much appreciated. Glad you like it!
DeleteGrand work as usual. Thanks for the stubble tip, it gives a more subtle effect than paint, I will give it a try.
ReplyDeleteThanks Phil. You're welcome! Give the stubble trick a try and let me know how you get on!
DeleteJust got here from Paul Alba's blog - great find! Really good tutes with great painting and terrain etc, (I like the 'Rat's Hole' sign above the bunker entrance - nice touch!) Really interesting blog Sidney - thanks!
ReplyDeleteDoc
http://docsartofwar.blogspot.com.au/
Thanks Doc! Welcome!! Hope you enjoy what you see here and what's coming shortly. Thanks for commenting as well - much appreciated.
DeleteFantastic looking pictures Sidney. The figures and terrain really compliment each other.
ReplyDeleteBeautiful work! Very interesting take on the stubble effect. I'm going to have to try that out. Thanks Sidney!
ReplyDeleteExcellent work Sidney
ReplyDeleteBeautiful! I just got interested in gaming the Great War over this past weekend and your Blog is inspiring me. Very nicely done on your Germans, and I'll be stealing your basing ideas.
ReplyDeleteCheers!